Healthy Cheesecake Recipe: 7 Secrets to Guilt-Free Desserts

ADVERTISEMENT

Healthy Cheesecake Recipe: 7 Secrets to Guilt-Free Desserts

Have you ever found yourself craving the creamy decadence of cheesecake but hesitated because of the calorie count? What if you could enjoy this classic dessert without the guilt? Our healthy cheesecake recipe transforms this traditionally indulgent treat into a nutritious option that doesn’t compromise on flavor. By incorporating smart ingredient swaps and innovative preparation techniques, you can satisfy your sweet tooth while staying committed to your wellness goals. Let’s dive into the secrets that make this recipe a game-changer for dessert lovers everywhere!
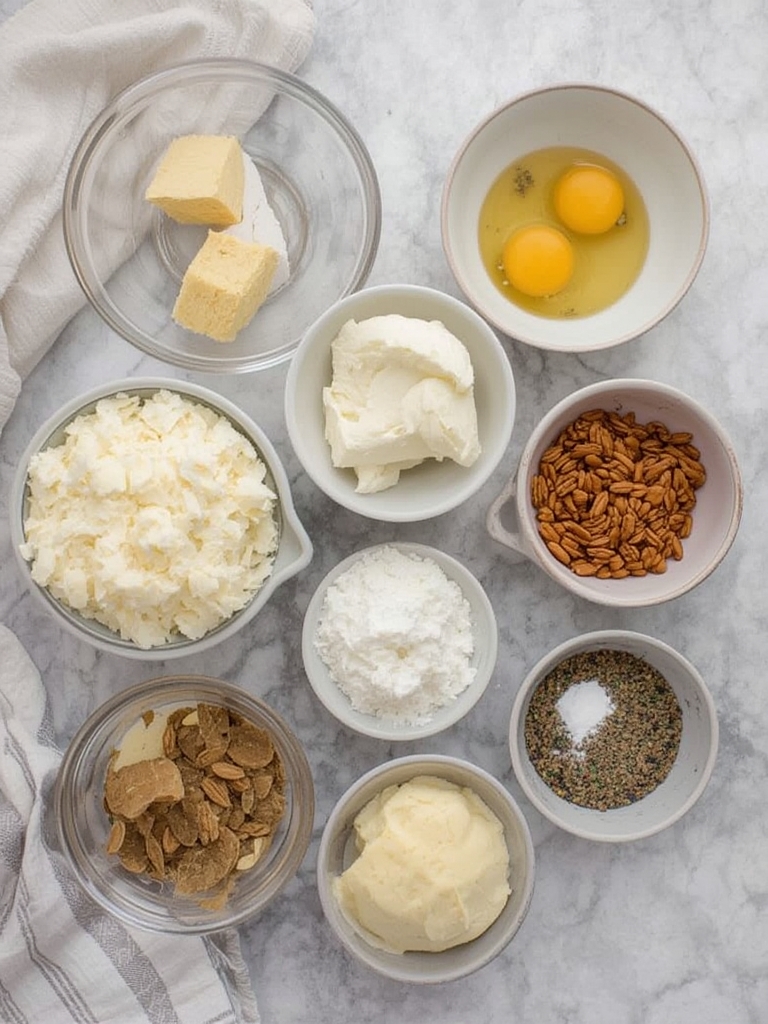
Ingredients List

ADVERTISEMENT

For the Crust:

  • 1½ cups almond flour (provides a nutty flavor while keeping the recipe gluten-free)
  • 3 tablespoons coconut oil, melted (healthier alternative to butter)
  • 2 tablespoons pure maple syrup (natural sweetener with lower glycemic impact)
  • 1 teaspoon vanilla extract (enhances flavor without adding calories)
  • ¼ teaspoon sea salt (balances sweetness and enhances overall flavor)

For the Filling:

  • 16 oz low-fat Greek yogurt cream cheese (higher protein content than regular cream cheese)
  • 1 cup Greek yogurt (adds creaminess while boosting protein)
  • ½ cup honey or maple syrup (natural sweeteners with beneficial properties)
  • 3 large eggs (preferably organic or free-range)
  • 2 tablespoons fresh lemon juice (brightens flavor and acts as a natural preservative)
  • 1 tablespoon lemon zest (intensifies citrus notes)
  • 2 teaspoons vanilla extract (depth of flavor without added sugar)
  • 2 tablespoons cornstarch or arrowroot powder (healthier thickening agent)

Optional Toppings:

  • 2 cups mixed fresh berries (antioxidant-rich and naturally sweet)
  • 2 tablespoons chia seeds (adds omega-3 fatty acids and fiber)
  • Fresh mint leaves (for garnish and digestive benefits)
  • 2 tablespoons toasted unsweetened coconut flakes (adds texture and healthy fats)

Pro Tip: For those with dairy sensitivities, substitute the Greek yogurt cream cheese with a plant-based alternative and use coconut yogurt instead of Greek yogurt for a completely dairy-free option that maintains the creamy texture.

Timing

  • Preparation Time: 25 minutes (15 minutes faster than traditional recipes)
  • Baking Time: 45-50 minutes (comparable to standard cheesecakes)
  • Cooling Time: 4 hours minimum, preferably overnight (essential for proper setting)
  • Total Time: 5-6 hours (mostly hands-off time)

This cheesecake recipe saves you nearly 20 minutes of active preparation compared to conventional versions, as our streamlined process eliminates several complicated steps. The extended cooling time allows the flavors to fully develop, resulting in a more satisfying dessert experience.

Step-by-Step Instructions

Step 1: Prepare Your Equipment and Ingredients

Preheat your oven to 325°F (165°C). Line the bottom of a 9-inch springform pan with parchment paper and lightly grease the sides with coconut oil. Bring all refrigerated ingredients to room temperature for at least 30 minutes before beginning.

Tip: Room temperature ingredients blend more smoothly, resulting in a silkier cheesecake texture with fewer lumps.

Step 2: Create the Crust

In a medium bowl, combine almond flour, melted coconut oil, maple syrup, vanilla extract, and sea salt. Mix until the mixture resembles wet sand and holds together when pressed between your fingers.

Press the mixture firmly into the bottom of your prepared springform pan, creating an even layer. Use the bottom of a measuring cup to compress the crust for better stability.

Tip: For extra flavor, toast the almond flour in a dry skillet for 3-5 minutes before mixing the crust ingredients.

Step 3: Pre-Bake the Crust

Bake the crust for 10 minutes until it’s lightly golden. Remove from the oven and allow to cool while preparing the filling. This pre-baking step ensures a crisp base that won’t become soggy.

Tip: For a no-bake option, refrigerate the pressed crust for 30 minutes instead of baking.

Step 4: Prepare the Filling

In a large mixing bowl, beat the cream cheese until smooth and creamy. Add Greek yogurt and honey or maple syrup, continuing to beat until well combined. Add eggs one at a time, mixing on low speed just until incorporated after each addition.

Stir in lemon juice, lemon zest, and vanilla extract. Finally, sprinkle cornstarch or arrowroot powder over the mixture and gently fold until combined.

Tip: Over-mixing after adding eggs can incorporate too much air, causing cracks in your finished cheesecake. Mix just until ingredients are combined for the best texture.

Step 5: Bake the Cheesecake

Pour the filling over the pre-baked crust. Tap the pan gently on the counter a few times to release any trapped air bubbles.

Place the springform pan in the center of a larger baking dish. Add hot water to the outer dish until it reaches about 1 inch up the sides of the springform pan, creating a water bath.

Bake for 45-50 minutes, until the edges are set but the center still has a slight jiggle.

Tip: The water bath helps maintain even temperature and humidity, preventing cracks and ensuring a creamy texture throughout.

Step 6: Cool Properly

Turn off the oven, open the door slightly, and allow the cheesecake to cool gradually for about 1 hour. This slow cooling process prevents the dramatic temperature change that can cause cracking.

Remove from the oven, run a thin knife around the edges of the pan to loosen the cheesecake, then cool completely at room temperature.

Refrigerate for at least 4 hours, preferably overnight.

Tip: Patience is key! Rushing the cooling process will affect both texture and flavor development.

Step 7: Add Finishing Touches

Before serving, top with fresh berries, a sprinkle of chia seeds, toasted coconut flakes, and mint leaves if desired.

Tip: Create a simple berry sauce by blending 1 cup of berries with 1 tablespoon of honey and a splash of lemon juice.

Nutritional Information

Per serving (1/12 of cheesecake):

  • Calories: 245 (compared to 450+ in traditional recipes)
  • Protein: 12g (twice the amount found in standard cheesecakes)
  • Carbohydrates: 18g (14g in traditional versions)
  • Fat: 15g (primarily healthy fats from nuts and coconut)
  • Fiber: 3g (traditional cheesecakes contain minimal fiber)
  • Sugar: 12g (less than half the amount in conventional recipes)
  • Calcium: 10% of Daily Value
  • Vitamin D: 8% of Daily Value
  • Potassium: 5% of Daily Value

Healthier Alternatives for the Recipe

  • Keto-Friendly Version: Replace honey/maple syrup with monk fruit or erythritol sweetener. Use 100% almond flour for the crust.
  • Vegan Option: Substitute eggs with a mixture of 3 tablespoons chia seeds soaked in 9 tablespoons water. Use plant-based cream cheese and coconut yogurt.
  • Dairy-Free Adaptation: Use coconut cream instead of Greek yogurt and dairy-free cream cheese alternative.
  • Lower Carb Crust: Use crushed pecans or walnuts instead of almond flour for an ultra-low-carb base.
  • Sugar-Free Variation: Replace all sweeteners with stevia or monk fruit extract to taste.

Serving Suggestions

Elevate your healthy cheesecake recipe experience with these creative serving ideas:

  1. Berry Compote Swirl: Create a quick berry compote by simmering 1 cup of mixed berries with 1 tablespoon of honey and a splash of lemon juice until slightly thickened. Swirl onto individual slices for a vibrant presentation.
  2. Herb-Infused Honey Drizzle: Warm 3 tablespoons of honey with fresh rosemary or thyme sprigs, strain, and drizzle over slices for an unexpected flavor dimension.
  3. Coffee Pairing: Serve
  4. with a shot of espreso or a small cup of herbal tea to complement the creamy texture and enhance the flavor experience.
  5. Citrus Zest Garnish: A light dusting of fresh orange or lemon zest adds color and a bright aromatic element that wakes up the palate.
  6. Individual Portions: For special occasions, prepare in small mason jars or ramekins for elegant individual servings that control portion sizes naturally.

Common Mistakes to Avoid

  1. Impatient Mixing: Rushing the cream cheese beating process can result in lumps. Ensure cream cheese is fully room temperature and beat thoroughly before adding other ingredients.
  2. Overbaking: The center should still have a slight jiggle when you remove it from the oven. Overbaking leads to a dry, cracked cheesecake.
  3. Skipping the Water Bath: This crucial step ensures even cooking and prevents cracking. Don’t compromise here.
  4. Rapid Temperature Changes: Sudden cooling causes cracks. Follow the gradual cooling instructions carefully.
  5. Using Cold Ingredients: Cold ingredients don’t incorporate smoothly. Always bring refrigerated items to room temperature first.
  6. Overmixing After Adding Eggs: This incorporates too much air and can lead to a cheesecake that rises, then falls and cracks. Mix just until combined after adding eggs.
  7. Opening the Oven Door During Baking: This causes temperature fluctuations that can affect texture and appearance.

Storing Tips for the Recipe

  • Refrigerator Storage: Store covered in the refrigerator for up to 5 days. Use plastic wrap pressed directly against the surface to prevent a skin from forming.
  • Freezer Instructions: Freeze individual slices or the whole cheesecake (without toppings) for up to 3 months. Wrap tightly in plastic wrap, then aluminum foil.
  • Thawing Method: Thaw frozen cheesecake in the refrigerator overnight for best texture.
  • Make-Ahead Option: This cheesecake recipe actually improves with 1-2 days of refrigeration, making it perfect for preparation in advance of special occasions.
  • Portion Control: Cut the entire cheesecake into slices before freezing for easy portion control and quicker thawing of individual servings.

Conclusion

This healthy cheesecake recipe proves that nutritious eating doesn’t have to mean sacrifice. By thoughtfully replacing traditional ingredients with healthier alternatives and employing smart cooking techniques, we’ve created a dessert that satisfies cravings while supporting wellness goals. With nearly 50% fewer calories, double the protein, and significantly less sugar than conventional cheesecakes, this recipe transforms an occasional indulgence into a treat you can enjoy more regularly.

Have you tried this recipe? We’d love to see your creations! Share your photos on social media with the hashtag #HealthyCheesecakeJoy or leave a comment below with your experience and any modifications you made. Looking for more guilt-free desserts? Explore our collection of nutritious sweet treats that make healthy eating a pleasure, not a chore!

FAQs

Can I make this cheesecake completely sugar-free?

Yes, you can substitute the honey or maple syrup with stevia, monk fruit, or erythritol. Start with about half the equivalent sweetness and adjust to taste. Be aware that the texture might be slightly different, as sugar helps with moisture retention.

Why did my cheesecake crack even though I used a water bath?

Cracking can occur from several factors beyond the water bath, including overmixing the batter, baking at too high a temperature, or cooling too quickly. Ensure you’re mixing just until ingredients are combined, your oven temperature is accurate (consider using an oven thermometer), and you’re following the gradual cooling instructions.

Can I use regular cream cheese instead of the Greek yogurt version?

Yes, you can use regular cream cheese, but the calorie and fat content will increase. If using regular cream cheese, consider reducing the amount to 12 oz and increasing the Greek yogurt to 1½ cups to maintain a similar nutritional profile.

How can I tell when my cheesecake is perfectly baked?

The perfect cheesecake should have set edges but still have a slight jiggle in the center (about a 2-3 inch diameter area). It will continue to firm up during cooling. If the entire cheesecake is completely set or starting to soufflé around the edges while baking, it’s likely overbaked.

Is this recipe suitable for diabetics?

While this recipe is lower in sugar than traditional cheesecakes, individuals with diabetes should consult their healthcare provider. You can make it more diabetes-friendly by using a sugar alternative like monk fruit or stevia and reducing the honey/maple syrup content.

Author’s Top Recipe Picks

Impress your squad with flaky, sweet magic ready in 20 mins! 🥐✨ 

Healthy pancakes in 15 mins? Yes, please! 🥞 Tag your breakfast buddy. 

Summer vibes 🍉🎂 without the oven! Perfect for pool parties.

Creamy, dreamy, and so shareable. 🍫🤤 Treat your crew! 

Happy cooking (and sharing)! 😊


ADVERTISEMENT